The
TTopRPG Form
When
you run TTopRPG (or TTop for short), you should see this form, or something
similar:
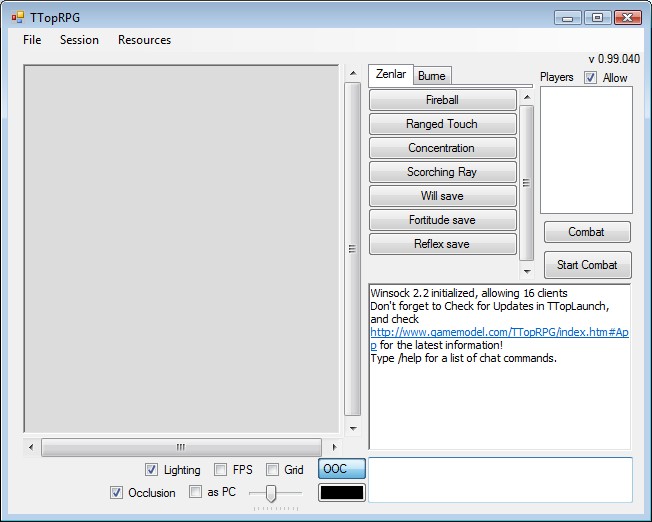
You
can resize the form by dragging the edges or using the maximize/restore buttons
in the upper right corner. You can minimize the application as well. If it
isn't the front window and some event triggers new text in the chat area,
the tray icon for the application will flash. This way, you can watch for
activity in TTop when you are using other applications.

Your
first campaign
With
that out of the way, let's create your first TTop campaign. Select File ->
New -> Campaign from the upper menu.
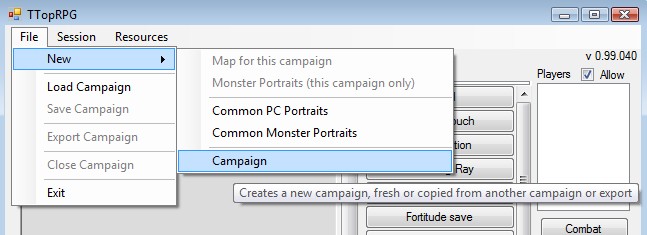
You'll
see this form:
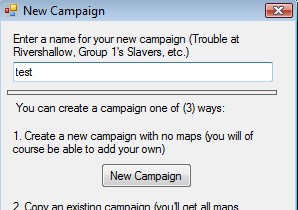
Type
your campaign name in the upper blank, like "test" or "practice",
then click the New Campaign button. This creates a new campaign with
the name you entered.
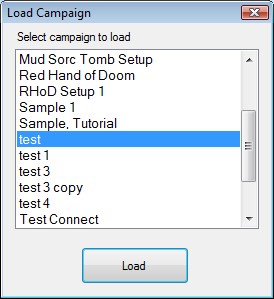
The
new campaign will automatically load. If you want to load it again later,
on the TTop main form, select File -> Load Campaign.
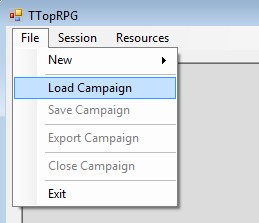
Select
the campaign you created and click Load.
Your
campaign is loaded now, but the map screen is still blank. This is because
fresh new campaigns don't contain any maps until you set one up.
Your
first map
Right-click
the map area and select Map: None -> New Map.
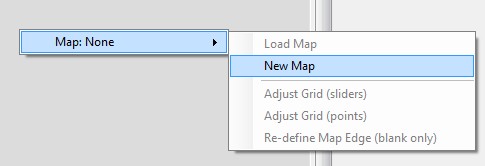
The
Add Map form appears.
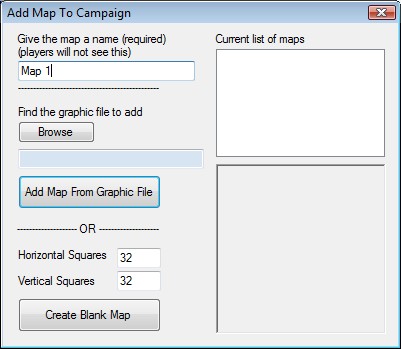
Type
a map name in the upper blank, like "Map 1" or "Practice 1".
If you have a map graphic ready to use, you can Browse for it in the middle
section and click the Add Map From Graphic file button to add the map.
If you don't have a map graphic, you can create a blank map by clicking the
Create Blank Map button at the bottom. You can change the number of
squares for the blank map if you like, but leaving them as 32x32 is fine.
You can redefine a blank map's size later if you like, but the size of a map
defined by a graphic is locked.
NOTE:
If you use your own map graphic, TTop works best with maps that are set up
for 50 pixels per 10 feet. TTop will support maps that go up to 100 pixels
per 10 feet. If your map is on a larger scale than that, you'll have to resize
it using another graphics program.
TTop's
scroll bars will prevent you from scrolling past the map's edge. So if you
are setting up a blank map, try to keep everything within the defined edges.
There,
you've added your map. But where is it? It isn't visible yet because you've
only added it to your map list - you haven't loaded it yet. Let's load it
now. Right-click the map area, and select Map: None -> Load Map -> Map
1 (or whatever name you gave it).
Now
the map should appear. You can drag the map around by pressing down with your
mouse and moving it around, or by using the scroll bars. TTop doesn't allow
infinite scrolling maps yet. They are limited in scroll area by the graphic
you provide or the number of squares you define for the blank map. You can
also zoom in and out by using the mouse wheel or the slider bar underneath
the map area:
 <-- here
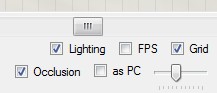
Click
the Grid checkbox at the bottom of the form to reveal the grid. The squares
are always 5' across. If you loaded your own map graphic and it isn't set
up as 50 pixels per 10 feet, these squares won't be the right size. We won't
worry about that for now, since this is just a test campaign. We will deal
with resizing the grid later, though. Let's try out some other functions first.
You
may notice that the grid appears like it's behind a gray veil. That's because
you haven't "revealed" any of the map yet. For now, just uncheck
the Occlusion box at the bottom of the form to remove the veil. You'll learn
more about occlusions later.
Basic
map indicators
This
section will be useful for both players and GMs.
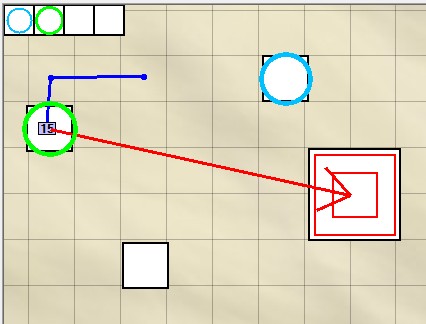
Markers
Move
your mouse anywhere on the map and hit the M key (or right-click and select
Place Marker). This places a marker on the map which temporarily displays
your name above it.
You
can get rid of it by highlighting it and hitting the Delete key.
Markers
are useful for showing other players a location, such as where a grenade weapon
is being thrown, where a character is teleporting to, pointing out a specific
feature, or anything else. Players can delete their own markers only. The
GM can delete any marker he likes.
You
can place as many markers as you like. Try not to make a mess!
Attack
arrow
Now
move your mouse anywhere on the map and hit the A key. A red arrow attaches
itself to your mouse, and you can click anywhere else to finish placing it.
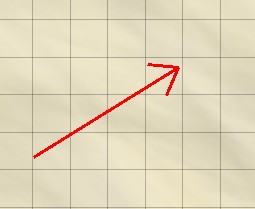
Attack
arrows are typically used to show which target a creature is attacking, but
can also be used to show where you are throwing a grenade weapon or spell,
or pointing out features, etc. Unlike markers, only one attack arrow is visible
at a time. This keeps the clutter on the screen down.
Note
that if you start to place an attack arrow and realize you don't want to finish
placing it, right-click to cancel the operation.
To
get rid of the attack arrow, right-click the map area and select Clear Attack
Arrow. This only removes the attack arrow from your screen, not anyone else's.
Plot
Path
The
most complicated operation in TTop for players is placing a plot path. Plot
paths show a creature's movement along a path that remains after the move
is finished. This way, the GM can see if you've crossed a trap or look for
opportunity attacks on you as you moved.
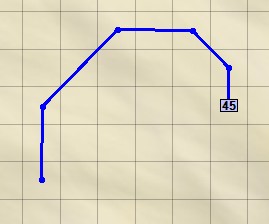
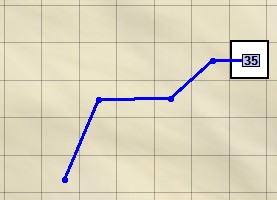
Move
the mouse on to the map and hit P. The mouse turns into a cross. Now, starting
in the very center of a grid square, click out a path up to 40 points, and
hit the space bar. Note that as you press the mouse button, the next path
segment is attached to your mouse, and you can move it around until you lift
up again. Also, if you hold SHIFT while you are placing a plot point, the
path segment turns purple, signifying difficult terrain. This counts double
towards the final length of the path, which appears on the last point.
While
you are plotting the path, you can start over with the S key, back up with
the Backspace key, or cancel with the Escape or C keys. These options are
also available in the right-click menu.
NOTE:
Plotted path distances are only accurate if the first path point starts in
the very center of a square. Bear this in mind if the distance seems off during
play. Creatures that take up an even number of squares across (such as Large
creatures in 3.5 OGL) should use grid intersections instead of grid square
centers for movement.
By
default, TTop counts diagonal squares as in the 3.5 OGL system. That is, the
first diagonal counts as 1 square, the next one counts as 2, then back to
1, and so on. In the Settings option in the upper menu, you can change this
to the 4e version so that all diagonals are counted as 1 square only. A future
enhancement will allow counting diagonals as 2 squares to support the Star
Wars SAGA system.
You
can clear the path from your screen just like the attack arrow by right clicking
and selecting Clear Path.
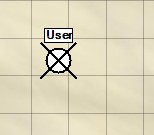
(GM
only) Ok, so you've place a path. Let's do something a little neater. Right-click
the map and select Place Icon. You'll see it in the middle section of the
popup menu. An icon screen will appear. Don't worry about selecting a graphic
or filling in the info blanks, just click OK. Icons are used to represent
creatures on the map. They can also represent features on a map that you might
want to quickly reveal or hide. More on that later. For now, just place the
icon. You'll notice it has a blue cross on it. Highlight the icon and hit
the V key to get rid of the cross (more on that later).
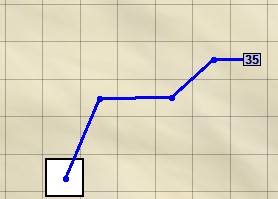
Now,
hit P again to start a path, but this time, start the path on the icon. Click
out your path, and finish by hitting the space bar. The icon moves to the
end of the path automatically! This allows the GM and players to quickly plot
out a path and move the icon in one operation, instead of plotting the path
then moving the icon manually.
Right
click the map and Clear Path. Now, try dragging the icon. A different kind
of path appears behind it. It shows the distance moved, and disappears 4 seconds
after you release the icon.

The
color of the drag path matches the color of the player moving the icon so
that the paths are easy to identify. This form of movement is useful while
exploring a map outside of combat, since multiple icons can leave this path
behind at the same time. During combat, however, the blue path plot is more
useful, since combat is typically turn based, and only one path plot can be
displayed at a time, and it remains indefinitely.
Chat
and Macros
This
section is also useful for both players and GMs.
Before
you start this section, close the program (save your campaign if you like)
and re-run it fresh. Don't load a campaign. If you already have some macro
tabs loaded, then you don't need to restart the program (but you may not be
able to follow the Zenlar and Burne examples as they are below).
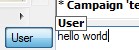
Let's
fiddle with the chat functions of TTop. Type something in the chat entry blank
under the chat output and hit enter. You should see black text in the chat
output similar to "User: hello world". This is how everyone
else will see what you typed.
Now
up above, look for the two tabs named Zenlar and Burne. If you don't see them,
stop TTop (save your campaign if you like) and re-run it. These are a couple
sample macro tabs I added for testing and figured I would leave them there
for illustration. The Zenlar tab should be in front. Back to the bottom, look
to the left of the chat entry and you'll see an OOC button (it may have the
name "User" instead). Click it and the name "Zenlar" appears
inside. Now type something in the chat area and hit enter. "Zenlar:
hello world" appears in the chat output. That button is how you switch
between speaking in and out of character. If you leave the button as Zenlar
and click the Burne tab above, the button changes to Burne. If you click the
button, it changes back to User.
Did
you see the little helper box above the chat as you were typing? This shows
you what name you will be posting as when you hit enter. It's useful for making
sure your chat line will appear as you want it to. Even though the OOC button
always displays the name that will result, it's easy to forget to check that
it is correct before hitting enter. So I added this little feature.
Now
enter some text preceded by either "/em" or "/me". The
format of the output changes a little to "User hello world",
without the colon. This allows you to emote phrases like "/me looks under
the bed", which results in "Zenlar looks under the bed"
if you intend to speak as the Zenlar character.
Let's
select a new color. Under the OOC button is a black button. Click it and select
a new color. This is the color your text will appear as in the chat output.
Note that this color won't be saved unless you are hosting a session or joined
one as a player.
You've
probably noticed that up above, when you click the Zenlar and Burne buttons,
new buttons appear underneath. These are called macros. If you move your mouse
over one and stop, a phrase will appear in a tooltip popup such as "/roll
d20+5". These are the formats of various random dice rolls. If you click
one, you'll see the results. The dice roller supports phrases up to 32 characters,
up to 99d999. You can combine phrases such as 1d8+12+2d6, but there are no
multiplier functions (yet).
To
see other macro functions (such as /turn), type /help in the chat entry and
hit enter. /turn reports the results of the 3.5 OGL Turn Undead roll. /roll
and /turn phrases can be typed into the chat area to manually roll a result
if you don't have a macro set up already. Note that the chat area also only
allows up to 32 characters in a /roll phrase.
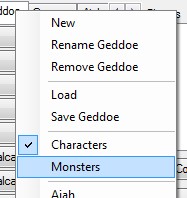
You
can change macros as you like by right clicking the buttons. You can also
drag them around to rearrange their order. As a GM or a player, this allows
you to set up your more common player character dice rolls. As a GM only,
you can also prepare monster macros. Monster macros are only accessible when
you have a campaign loaded, since they are specific to the campaign you are
hosting. You can access the monster macros by right-clicking the tab list
and selecting Monsters down below. Only GMs can do this. Load a campaign to
see it, if you wish.
If
you are running a complex urban campaign, you may have many names loaded in
the tab strip so that you can easily speak in character using any of them.
To facilitate faster selection, when you right-click the tab strip, all of
the names on the tab strip appear alphabetized at the bottom of the popup
menu. Here is an example:
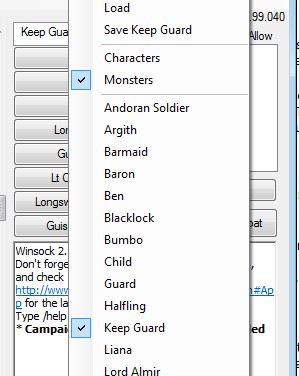
Right-clicking
the tab strip also gives you other options such as saving the tab, renaming
it, loading a saved one, removing it, etc. Note that if you save a character
tab, it is saved in a folder that will be common for ALL campaigns. I haven't
added routines to separate out saved character macro sets for each campaign
yet. If you use TTop to run many campaigns, you'll likely end up with a large
list of character macros if you save them. Monster macros, however, are saved
inside the campaign folder, which means other campaigns cannot access them.
So, if you have several monster macro sets you'd like to use for multiple
campaigns, the other campaigns can't access them. I'll be adding features
eventually to organize macros in a more convenient fashion.
Note
that if you save a campaign with macros in the tab list, those macros will
be saved as they are and will be restored when you reload the campaign. That
kind of saving is separate from right-clicking a tab and saving it and does
not save the character macros to the common folder.
As
a GM, you can right-click a character tab and Give that tab to a player. The
player will then have access to that tab and its macros. The player will be
able to rename the tab and alter the macros as they see fit (including remove
the tab, which will also remove it from the GM's tab list!). If the GM then
gives the tab to another player, the old player loses it.
Note
that when you want to right-click a tab, make sure you left-click it first
to bring it to the front (I've been unable to bring a tab forward with a right-click
yet).
Setting
up a campaign
Preparing
a campaign to run an actual game online can be as simple or as complex as
you like. When I wrote TTop, I kept in mind that I may sometimes want to just
draw maps as needed for an impromptu session, or I may want to load in pre-made
maps from a published scenario and set up all the room descriptions, creature
icons and macros, etc. so it is all ready for play.
If
you want TTop to track combat for you and provide room descriptions, then
preparations made in TTop before the session will save time during the session,
allowing for smoother play.
TTop
Limitations
It's
very important to understand some key limitations in TTop. The ease of placing
objects on a map may deceive you into thinking that TTop will do whatever
you want during a game. Understanding these limitations is key to avoiding
that frustration:
Adjusting
the Map Grid
In
order for creature icons to appear in the correct scale and paths to measure
an accurate distance, you'll need to line up the map's grid so that its squares
correspond to 5'. Some map graphics will already have a grid laid out. You
will still need to line up the grid with the map's grid so that scale is maintained.
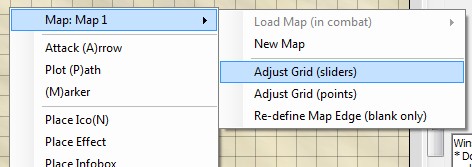
TTop offers two ways to align the map grid. To adjust the grid, right click
the map area on a loaded map, bring up the map's submenu, and select either
Adjust Grid (sliders) or Adjust Grid (points).
Note
that adjusting the grid on a blank map isn't necessary. But if you plan to
add sketch lines or Map Builder shapes to a blank map to decorate it, bear
in mind that adjusting the grid afterwards will not resize or move those additions.
So set a map's grid the way you want it before you add sketches and Map Builder
shapes, and leave it there.
Another
important note about squaring up the grid: If you are using a map graphic
that has its own grid or walls that are clearly meant to line up with a square
grid, it is possible (especially with scanned maps) that the map isn't squared
properly (that is, the grid squares aren't quite truly square). In this situation,
it will be impossible to get the grid squares in TTop to line up unless you
load the map graphic into another program and resample one of its axes so
that it becomes more perfectly square. As another option, you could use the
MapBuilder functions to place the map graphic as an image and resize it manually
within TTop.
The
Sliders option allows you to resize and position the grid using sliders. The
two upper sliders will move the grid so that its lines coincide with where
you want them to appear on the map. The two lower sliders affect the size
of the squares - the upper one resizes the squares in larger increments, will
the lower one allows finer adjustment.
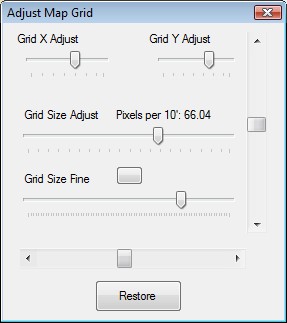
Note
that this way of adjusting the grid can be difficult, since the center of
resizing is the upper left corner of the map. It's easier if you can get the
size correct using the lower sliders, then use the upper sliders to position
them correctly. Hopefully after a few uses you'll get the hang of it.
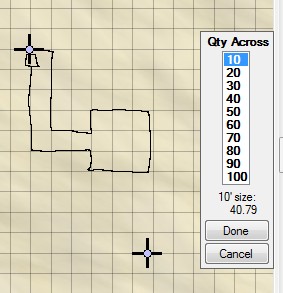
However,
adjusting the grid using the Points option might be a little easier. I set
this up so that the upper left point is meant to sit directly on a grid intersection,
and the right point is used to resize the grid. When you select this option,
a small panel appears on the right side of the map, allowing you to select
how many squares appear between the two points. You should set this value
to the largest number of squares on a given axis for the map. Place the left
point on a grid intersection in the upper left area of the map. Then drag
the right point until the grid is sized correctly. You may need to return
to the left point to tweak its position a little. I find the Points option
to be a more intuitive way of correctly resizing the grid.
The
reason it is so important to set up the grid accurately is so that the distance
value on the plot path is accurate. The grid doesn't have to be off by very
much to get inaccurate distance values when you are plotting paths or using
it to measure distances. An accurate grid will also ensure that the various
indicators (markers, icons, attack arrow, effects, Mapbuilder textures, etc.)
appear with the right size.
Note
that when adjusting the grid, TTop enforces the maximum of 100 pixels per
10 feet on the map. If you are using a map graphic that is on a larger scale,
you will have to resize the map somehow (MS Paint is one option: Load the
map graphic into Paint and use the Image->Resize/Skew function). Another
option is to place the map as a MapBuilder image and resize it that way. You
would need to create a blank map in TTop first to do this, however.
Sometimes,
you may want a map to represent a larger scale, such as an area wilderness
map. You could set up the grid so that the plotted path accurately represents
the distance travelled in miles, or some other scale. Sometimes I will set
up a map so that 10 units moved on the path = 1 mile. The limitation of TTop
only allowing 100 pixels per 10 feet maximum may force you to compromise on
the scale a bit, but it works. Remember that TTop by default counts squares
as in the 3.5 OGL system, but you can turn off this option with the Settings
selection in the upper menu so that the distance measurement is more accurate.
This will give you better measurements on large area maps where tactical movement
doesn't need to be counted in squares.
Sizing
the grid correctly might be a little easier if you lay a path between two
points that you know are supposed to be a certain distance apart, then adjust
the grid size until the distance is correct. In the Settings form, turning
off Count Squares may make this easier to use as a gauge while you resize.
For
another detailed discussion about lining up the grid, check out the Grid
TTopForums Thread.
Please
note that once you get the grid lined up correctly, you only need to keep
the grid displayed if the map itself doesn't already have its own grid. The
Grid checkbox at the bottom of the TTop form will turn the grid on or off.
All players have this option. If the GM wants the grid to be visible for a
map, the players will have to turn theirs on as well.
You
may have noticed the Redefine Map Edge option in the map submenu. This
allows you to define a new rectangle for the edges of a blank map. This makes
it possible to resize the map when you realize you need more room to work
with. This function is not available on maps defined by a graphic.
Occlusions
Usually,
when players enter a new map, there are areas you don't want them to see yet.
The Reveal/Hide function allows you to reveal or hide certain areas of the
map as they become visible to players. TTop only allows the freehand version
of this function.
The
GM sees the occlusion as a see-through veil. The players will see this as
solid gray. You can check the "See as PC" checkbox at the bottom
of the TTop form to see what the map will look like for players.
Right-click
the map area and select either Reveal or Hide. Then hold the left mouse button,
draw out an area on the map, and release the mouse. The area should reveal
or hide depending on your selection.
If
you are drawing out an area and you realize you made a mistake, you can right-click
to cancel the operation before you release the mouse.
You
have other options in the right-click menu during Reveal/Hide as well. You
can switch between Reveal and Hide using this menu. There is also an Explored
option which places a translucent veil over the area, signifying that the
players have been there but can no longer see it. I haven't found a need for
this option very often myself, but it's there in case you want it. You can
also set all Revealed areas to Explored and vice versa. Finally, you can reset
the map to hidden by Hiding All.
TTop
can usually render these hidden and revealed shapes very well until you have
drawn out a lot of them on a single map (meaning 50-100 or so). After that,
the scroll rate may start to get a little choppy. For my own purposes, it
has worked fine.
Info
boxes
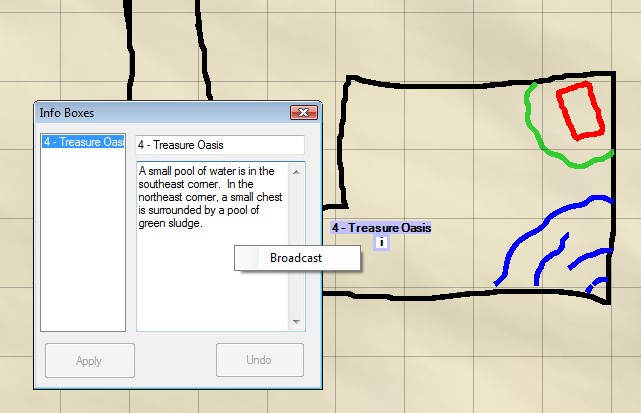
Info
boxes are useful for quickly broadcasting room descriptions or other information
to players. You can also leave notes for yourself on the map.
Right-click
the map and Place an Infobox. Fill in the title and content and click Apply.
Then right-click the content and select Broadcast. You'll see the content
appear in the chat area. This is how you broadcast information to players.
If an info box is there for your own information only, you naturally shouldn't
broadcast it to players.
On
the map, you can double-click an existing info box to bring up its information.
There is also a list of all info boxes on the left so that you can quickly
select any other info box on the current map.
When
I fill in room descriptions, I usually place the room number and a small title
for it in the title area, such as "Room 3 - Broom Closet". That
way, when I'm scrolling around the map and I'm curious which room number I'm
looking at, I can just highlight the info box with my mouse. Then I can look
up the room in the printed detail of the published scenario I'm running so
that I can refer to any other information about it.
Sketching
Right-click
the map and select Sketch Mode. The mouse will become a cross, and you'll
get a small selection panel on the right with 4 colors. This mode allows you
to draw lines on the map as you would a battlemat on a table. Right-hold the
mouse and you can erase lines that you place. This is just a simple drawing
mode that allows you to draw maps on the fly without using any fancy graphics.
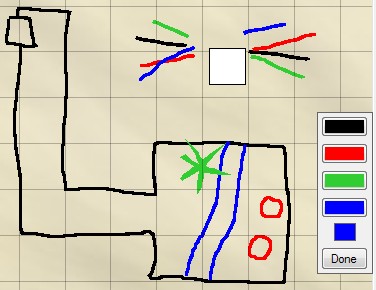
Note
that sketch lines will appear underneath the grid if you have the grid displayed.
Map
Builder
For
a more detailed discussion about Map Builder, I wrote three articles over
at TTopForums.
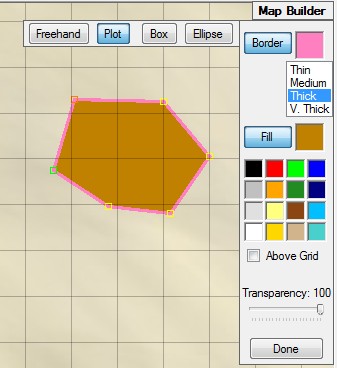
Recently,
I added the ability to make fancier looking on-the-fly maps. Map Builder allows
you to place images that you can resize and rotate, and draw out boxes, ellipses,
freehand and plotted shapes, with or without borders, filled with color or
textures.
I
won't extensively detail the functions here, since it isn't in its final form
yet. Try out the options. Hopefully it's easy enough to work.
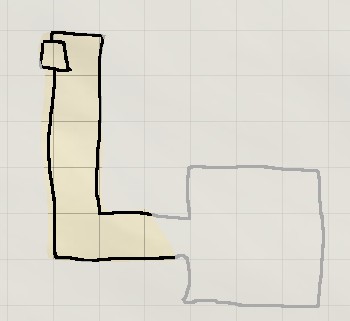
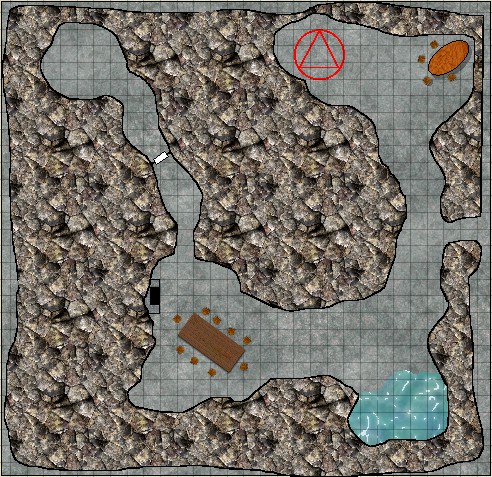
For
the above sample picture, I first placed a large gray stone rectangle. Then
I drew out the colored stone walls above the grid. It took multiple drawn
sections to make up the whole map, which resulted in multiple visible borders
inside the walls - so I placed borderless wall sections over the lines to
cover them up. The tables and chairs are placed images. The shadow under the
table in the upper right corner is just a second black transparent ellipse
placed underneath the table image.
I'll
talk about the most complicated aspects here.
One
is understanding the difference between Campaign textures and Common textures.
When you Place an Image or right click the Fill box in Draw Shapes mode, you
can select a texture to fill the placed object. The selection screen gives
you the option to add a new Campaign or Common texture. Campaign textures
are only accessible in that campaign. Common textures will be available to
all campaigns.
Another
is understanding that when you draw a shape that is Above the Grid, this will
place it above the grid lines if you have them displayed. This is useful for
placing areas or objects that you don't expect creatures to walk on, such
as tables or dungeon walls. Placing them above the grid gives the scene a
sense of depth. However, shapes placed above the grid will hide Sketch Lines,
since those are always below the grid. Map shapes placed above the grid will
also hide icons that are set as features (see the Icon section below).
When
you first enter Map Builder, you can right click the map and place an image
that you can rotate, move, etc.
In
order to draw more freeform shapes, right click and select Draw Shapes.
The Draw Shape panel appears. You will not be able to drag or adjust shapes
(ellipses, boxes and plotted only) in Draw Shape mode. Click the Done
button on the Draw Shapes panel to adjust shapes after you've drawn them.
Some
shapes will allow you to copy them (images, boxes and ellipses) with ctrl-C
and paste with ctrl-V. You can adjust the vertices on plotted shapes, as well
as insert, split, continue plot, etc.
Try
to avoid using excessively large image and texture objects for MapBuilder,
especially if you plan to place many images of a certain graphic.
Map
Builder will allow you to create a blank map in TTop, place a map as an image,
and resize it as you please as well. If the map graphic is very large, however,
you may be better off resampling it down to something smaller in another program
first.
You
can only access the placed map shapes in Map Builder mode. Map Builder objects
aren't intended to be made visible or invisible during play. Use icons set
as features for that purpose.
Icons
and Features
Of
all the options in TTop, I consider icons and features to be the most important.
Other apps may refer to similar objects as tokens.
A
detailed dicussion about Icons can be found in this
thread at TTopForums.
Icons
represent any creature in the game that is meant to be moved or fought. They
also represent anything on the map you may want to quickly reveal or hide
with a click of the V key.
Normal
icons will always appear with a black border, and if the graphic used to represent
an icon is blank or non-square, they will be filled in from behind with a
white square to fill in the gaps. This way, icons will always appear perfectly
square.
Players
can highlight icons to check their hit point status in combat, but they can
only move or modify PC icons. Players can only change the name and graphic
on PC icons. No PC icons are assigned to specific players - all players can
move all PC icons. This is different from players only having access to specific
character tabs and macros. I haven't seen a need yet to lock PC icon access
to specific players. PC icons will appear as portraits in the lower right
of the screen so that players have constant access to their hit points. When
you load a new map, if the PC icons aren't already a part of the map, they
will be invisible in the upper left corner, allowing you to place them.
If
you don't want an icon to have a hit point status, then just set its total
hitpoints and current damages to zero. This way, when it is highlighted, a
neutral name appears above the icon with no hit point status.
Usually,
pit traps and secret doors are also placed as icons so that they can be quickly
revealed or hidden, and players can highlight them to identify what they are.
For my own purposes, I have simple graphics for pits and traps - a box with
a lined X in it, and another with an S inside.
Icons
set as features will appear below the grid lines (and below Map Builder shapes
placed above the grid). This is useful for placing items as simple as chairs
or chests, or as complex as a floor plan for the inside of a building (make
the floor plan visible as the PCs enter, kinda snazzy!). PNG graphics work
best for this, since they can be masked out to have non-square edges. Feature
icons, unlike normal icons, are not drawn with borders, are not filled in
from behind to appear square, and cannot be highlighted by players. Features
can be locked in place. Features not locked in place can be dragged, but they
will not leave a drag path behind.
If
you want to hide an icon from the players, simply moving it into an unrevealed
area of the map isn't good enough, since the players can see all icon statuses
by holding the SHIFT key. You MUST make the icon invisible (highlight and
hit the V key). If you want to show an icon moving into a hidden area, the
best way to do so without revealing its destination is this: Plot a path from
the icon, but hit P to finish the plot instead of Space Bar (which would move
the icon). Make the icon invisible, then drag it to the end. The players won't
see the drag path because the icon is invisible.
If
you want to move a visible icon without showing its drag path to the players,
hold SHIFT while you are dragging it.
Paths
plotted from invisible icons will appear see-through and will not be visible
to players. This is also true for drag paths.
Note
that icons cannot be rotated. I didn't want to clutter the interface with
too many options.
If
in Settings you have Snap To Grid checked, then icons will be forced to remain
centered in the grid squares as they are dragged. Even-square-sized creatures
(Large, etc.) will remain on grid intersections. Tiny creatures (1 and 2 feet
across) will snap to smaller areas within a grid square. When snapping to
grid, a Plot Path started on an icon will snap to the grid in the same way
the icon would.
You
can set an icon to possess low-light vision and/or darkvision. This becomes
important for lighting (see the Lighting section below). When you highlight
an icon with lighting enabled, you'll see everything as that icon would see
things. Players can only do this with PC icons.
When
selecting graphics for icons, try to use smaller graphics: 20-30KB size files
at the maximum. You can add Common PC portraits with the File-> New->
Common PC Portrait selection from the upper menu. You can also add Common
Monster portraits from the File -> New menu, but this option also exists
in the Place Icon form. You can add Common Monster and Campaign portraits
from the Place Icon form. Common PC and Common Monster portraits are available
for all campaigns. Campaign Monster portraits are available only for the current
loaded campaign. Common PC Portraits are available for players to select from
when setting the graphics for their PC icons. You can manage these lists with
the Resource Manager in the upper menu.
For
an icon to participate in TTop's combat tracker, it must have an init mod
value. When Combat is started, highlight the icon and hit I. The icon's initiative
will be rolled and it will be entered into the combatant list. Note that combat
can only take place on one map at a time, so if combat is going to spill over
into another map, you'll have to sketch aspects of the other map on to the
current one until combat is complete. Only the GM can damage and heal icon
hit points.
You
can multi-select icons by ctrl-selecting each icon or by ctrl-dragging a rectangle.
Selected icons will have a thicker highlighting around them. You can make
all of them visible or invisible with the V key, delete them all at once with
the Delete key, drag them all by dragging one of them, or modify all of them
(you can choose which attribute(s) you modify). Note that if you drag multiple
selected icons, the drag path will only report from the visible non-feature
icon you are actually dragging. In the right-click menu, the operations that
can affect all selected icons will have brackets ( [] ) around the menu selection.
You
can also ctrl-C to copy an icon and ctrl-V to paste it. This works with a
group of selected icons as well.
Effects
Effects
are colored areas on the map to signify spell effects such as a fireball,
darkness, cone of cold etc. Only the GM can highlight and move effects. Players
are expected to describe to the GM where they want the effect placed.
I
force effects to be drawn as squared templates so that there is no question
as to whether or not an effect crosses into an icon's space.
Lighting
For
another detailed discussion about setting up lighting, check out the Lighting
thread at TTopForums.
During
one session, I had some players wandering around a town at night time, but
I had no representation of illumination. Two players agreed that knowing the
locations of the darker areas would have been helpful. So, I added lighting.
This is a more advanced subject that requires some planning to set up, but
the set up is actually fairly quick considering the complexity involved in
getting it to work.
The
simplest way to make use of lighting is to just place light sources, possibly
attaching them to PC icons so that the players have a light source while they
are walking around a map.
If
you want the lights to interact with surfaces and cast shadows, then you'll
need to place some shadow walls. Usually, I place shadow walls so that the
segment normals point into the object that would cast the shadow. Then, if
I want the deeper parts of a surface to block light entirely, I place another
shadow wall deeper inside, set it to force Light to Darkness, and face its
normals outward. This way, walls will allow some shadow at the edges but force
darkness inside the extremes.
If
you don't place any darkness walls on your map, then shadowed light from the
other side of a wall will illuminate a room on the other side. Darkness walls
prevent the light from getting across the areas that really shouldn't allow
any light through.
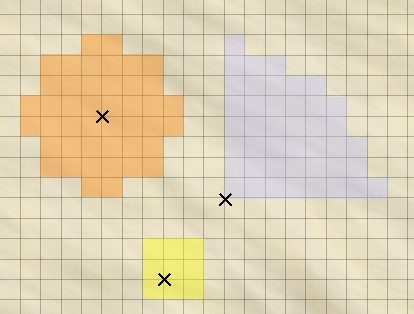
You
can also place a shadow wall and define it as an area of darkness, shadow
or diminished light. This allows you to have areas of darkness when the ambient
light is full. This is useful, for example, when you have a town in full daylight
but a dark cave in the corner. Place an ambient light source outside the cave
to simulate its entrance being illuminated by the daylight. The various options
allow you to get somewhat artistic.
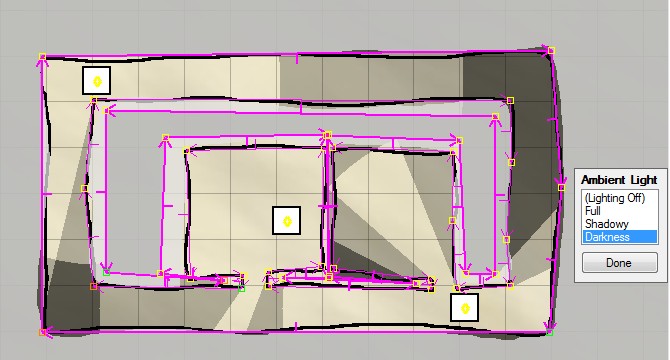
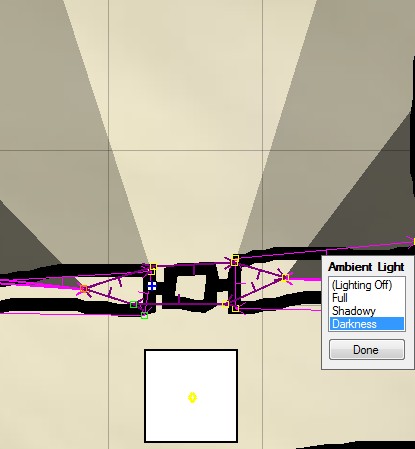
Optionally,
to finish the lighting setup, you can prepare small darkness walls around
doors and Show their Indicator. This way, in normal mode, you can highlight
the indicator for the wall and hit V to activate or deactivate it. This allows
light to flow into rooms when the doors are opened. These next two snapshots
illustrate this. You can see the small indicator I've made visible. On the
right, the wall is made inactive, allowing the light to illuminate the room.
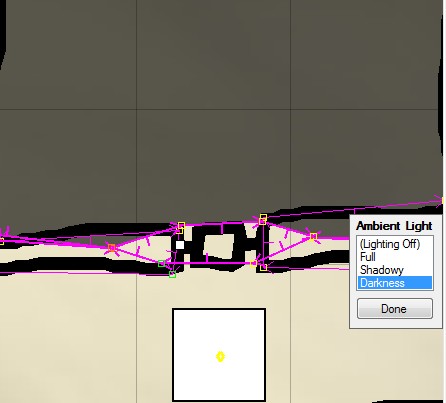
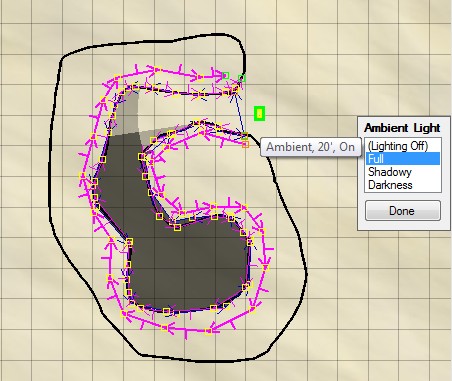
Secret
doors are a little trickier. You want light to cast through the opened secret
door properly without revealing its presence by how the light behaves before
it is opened. Note the following pictures:

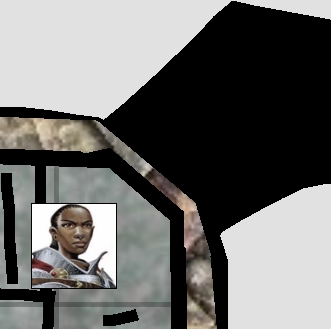
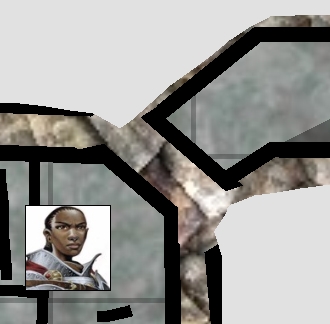
The
first picture shows how the lighting walls are defined around it. Notice that
the shadow walls do NOT form a hallway through the secret door. This prevents
shadows of passing lights from revealing the opening there (this only works
if the normals are facing into the walls). I defined darkness walls around
the perimeter on both sides as I usually do, then made a final darkness wall
across the doorway that I can remove with a V click on the indicator. The
second and third pictures show how it looks from the player's perspective
when the darkness wall across the opening is active and inactive.
Lighting
creates some nice effects, but it is also processor intensive. With many light
sources, there is so much calculation on rendered regions that scrolling the
map and moving icons can be very choppy. So use this function with care.
You
can ctrl-C to copy a single light source and paste it with ctrl-V.
As
a final note, if you want to place an area of magical darkness that can't
be penetrated by light, you'll have to use an Effect to do so (see the Effects
section above).
Sessions
Sessions
are how online games take place in TTop. One user serves as the GM, and everyone
else serves as a player. GMs have access to everything, and players can only
access their assigned macro tabs, macros, all PC icons, markers, attack arrow,
and plot path. Players can also use the Grid checkbox, but won't have access
to the Lighting, Occlusions or See as PC checkboxes.
To
host a session, you need to understand how to make your PC available to connect
to. TTop uses port 26010 for its hosting connection. Players must be able
to reach your hosting machine through that port. See the main TTopRPG page
for troubleshooting.
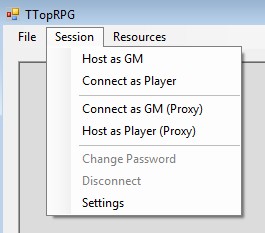
When
you host (using Session-> Host as GM), TTop will ask you for a username.
It can be whatever you like, and TTop will remember the name the next time
you host. Password is optional and can be changed during the session if needed.
You can only host when you have a loaded campaign. You cannot load another
campaign or close the loaded campaign while hosting, but you can add new maps,
graphics, etc. to the loaded campaign and save it (often!) during the session.
Players
connect by using Session-> Connect as Player and entering a username
(which should be their online handle, not their PC name), password (if needed),
and the IP address or host name for your machine. Once a connection is successful,
TTop will remember the last username used to connect, and keep a running list
of all server addresses that have been successfully connected to.
Players
will download all necessary graphics from the host machine automatically.
A collected archive of downloaded files will accumulate in the player's campaign
folder. This prevents players from having to download all the graphics again
the next time they connect. If the GM changes a graphic between sessions (or
uses the Resource Manager to replace a portrait during a session), players
will automatically download the new graphic.
As
players connect, you will see their names in the upper right player list with
the colors they selected. Indicators to the left of their names tell you their
status. A keyboard key means they are typing something. Other symbols represent
disconnecting (a broken line), sketching (pen drawing a line), and revealing
or hiding the map (a tiny map). The GM can right click a player name and Boot
them from the session if necessary. The GM can also change the password and
uncheck the Allow checkbox above the player list to prevent future connections.
As data is sent down to players, the GM can see how much data remains in their
pipelines by watching the percentages next to their names. /ping typed in
the chat area will provide ping times to each player. The players can /ping
as well.
When
a session is open, most information presented in the chat area is appended
to a campaign text log file on every machine that is connected to the session.
On the GM's machine, this file is campaignLog.txt in the campaign folder.
On player machines, the file is clientLog.txt in the campaign folder.
This can be problematic if a single player machine connects to several other
sessions with the same campaign name, but I presume that won't happen very
often. You just end up with information from multiple campaigns in the same
file. The GM doesn't have to worry about this problem. These log files allow
you to go back through the session at a later time and confirm events or transcribe
a campaign journal. These text files can be opened in Notepad but may be better
viewed in Wordpad, since Notepad doesn't wrap long text lines.
Proxy
sessions are used when the GM for whatever reason can't give players direct
access to his machine. Instead, a player that can provide access serves as
the session host, but the GM is still able to connect to the session as a
GM. To do this, the hosting player selects Session-> Host as Player
(Proxy). The GM then uses Session-> Connect as GM (Proxy), and
the rest of the players connect normally. In this kind of a session, the player
serving as the host will have boot authority over players instead of the GM.
Otherwise, the session operates as usual, albeit a bit more slowly, since
the GM machine has to forward responses to the hosting player's machine, which
then forwards that information to everyone else. If the GM disconnects for
any reason, all of the players except for the session host are dumped out.
No one can connect to the hosting player until a GM connects first.
As
the GM, you can use the Session-> Settings form to determine the
way TTop handles certain aspects of the session. These include Snapping to
Grid, whether or not distances are counted in squares, how diagonals are counted,
and if initiative order is revealed to the players.
Combat
A
much more detailed discussion on Combat can be found here
at TTopForums.
I
added a combat tracker to TTop to make combat a little easier to handle. With
TTop's combat functions, you can roll initiative for icons, allow icons to
delay and ready actions, remove them from combat, assign conditions, and add
spell timers for spell duration tracking.
To
start combat, click the Start Combat button. A message pops up telling
everyone to highlight their icons and hit I. Icons will need to have their
initiative modifiers set up for this to work properly.
After
initiative is rolled, you will see the initiative order in the upper left
corner of the map screen. Players can see the initiative order as well unless
you changed the Settings option to keep them from seeing it. Also, players
will not see invisible combatants (that is, icons hidden with the V key) listed
in the initiative order.
To
advance the turn in combat, right click the map and click the bolded Advance
Turn option. I decided not to make this a button on the main form, because
once you advance the turn, you can't back it up. As combat begins, the first
advance message in the chat area will be "Round 1". Advance
again and the first combatant can take their turn (signified by a green circle,
which all players can see unless the icon is invisible). When all combatants
have taken their turn, the next advance message will be "Round 2",
and so on. If there are going to be new combatants adding to the fight, I
prefer to roll their initiatives during the Round message. When a PC icon's
turn comes up, a message saying that it is the icon's turn will appear in
the chat area.
To
set an icon as delaying or readying an action, right click the icon and look
for the Combat Status item. Its sub-menu contains Normal, Readied,
Delaying, and Out of Combat. Out of Combat removes the icon
in the initiative order. Readied icons have a yellow circle, and delaying
icons have a blue circle. Players can see these circles on PC icons, but not
on monster icons.
You
can allow a delaying icon go after the current combatant by right clicking
and selecting End Delay (Go Next). Players should announce their intent
to end delay during that icon's turn, otherwise it would function more like
a readied action. When you advance the turn, it will be that icon's turn next.
A
readied icon can take its triggered action by right clicking and selecting
Trigger Readied (Go Now). The icon is placed before the current combatant,
and the readied icon can now act.
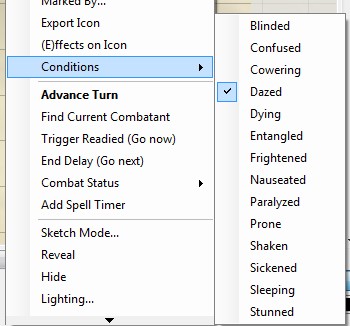
Assign
a condition to an icon by right-clicking the icon and looking in the Conditions
sub-menu. Various conditions from the 3.5 OGL are there, but not all of them.
All conditions result in a red square on the icon that all players can see.
Some conditions might add a circle, diamond, or smaller square inside to denote
other effects (being prone, paralyzed, or otherwise unable to act normally).
To
set a spell timer, right click the icon initiating the effect and select Add
Spell Timer. A form pops up asking for a description and number of rounds.
A checkbox asks if the spell timer should expire at the beginning or end of
the icon's turn. Effects like a dragon's breath recharging should expire at
the beginning of the icon's turn. Spell effects like a mind control spell
should expire at the end of the caster's turn. Note that if the icon's initiative
order changes due to delaying or readying an action, the time that the spell
is meant to expire will be preserved. That is, the timer will count down at
the original point in the initiative order, not in the icon's new position
in the order. Once the spell timer is in place, you will get messages telling
you how many rounds remain on it as its time passes each round. Players do
not see these notifications.
The
Combat form allows you some access to the combatant list and spell timers.
Click the Combat button and a form will pop up with both lists. Using
these lists, you can alter a combatant's place in the initiative order by
altering its initiative roll, alter spell timer descriptions, add new ones,
edit their attributes, etc. The Combat form also has the only place in TTop
where you can record general notes about the campaign, such as recording that
someone is diseased, or in 2 days something will happen, etc. You won't need
to open this form very often.
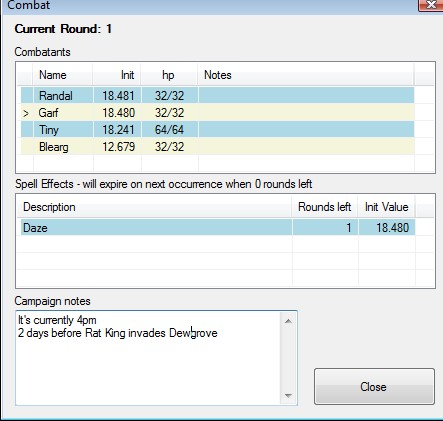
In
the Combat form, you may also notice that initiative rolls have 3 decimals
after a whole number. Whenever an initiative is rolled, TTop adds .000-.999
to the init roll to help ensure there are no duplicates. If there is a duplicate,
the combatant already there gets pushed down. With only 1 chance in 1000 of
this happening, I doubt it will be much of a problem. Some GMs like to give
the init order to the combatant with the highest init modifier. TTop does
not award duplicates this way, since the init modifier was already applied
to the original init roll.
While
you are in combat, you cannot load a new map. This is because the icons in
memory must remain there in order for combat to proceed properly in TTop,
and loading a new map would empty and alter that list. Click the End Combat
button when the fight is over, and you will be able to load a new map. If
the combat must spill over into a new map, then be prepared to use the Sketch
or Map Builder functions to draw the portions of the map necessary to continue
the fight.
...
Well,
that pretty much covers most of what TTop can do. Use as much or as little
of it as you like, and don't forget to have fun!